I was standing in my kitchen at 2 a.m., half‑asleep, with a half‑eaten bag of chocolate chips and a tub of vanilla ice cream that had been begging for a purpose. I tossed the chips into the bowl, swirled the ice cream, and before I knew it, I’d invented a dessert that feels like a hug from your favorite childhood cookie‑monster. The moment the first spoonful hit my tongue, I swear the world paused—sweet, buttery, and icy all at once, like a summer snow day in a bowl. Most people think you have to choose between a warm cookie and a cold scoop, but I’m here to prove them wrong. This isn’t just a treat; it’s a revelation that will make you question every dessert you’ve ever known.
Imagine the aroma of freshly baked chocolate‑chip cookies drifting through the house, mingling with the faint perfume of vanilla ice cream that’s been softened just enough to be spreadable. You can hear the faint crackle of the cookie edges as they set, feel the coolness of the ice cream against the warm metal of the mixing bowl, and taste that perfect balance of crisp dough and creamy chill. I’ve tried a dozen “cookie‑ice‑cream” combos, and most of them either turned into soggy messes or ice‑cream‑free cookies that left me wanting more texture. This version, however, nails the texture on both fronts: the cookie base is chewy‑golden, the chocolate chips melt in your mouth, and the ice cream layer stays luxuriously smooth without turning into a freezer‑burned brick.
What truly sets this recipe apart is a secret technique I call the “double‑chill method.” Instead of simply folding ice cream into the dough, I freeze the cookie dough first, then sandwich a thick layer of softened ice cream between two thin cookie slabs before the final bake. The result? A bar that looks like a classic chocolate‑chip cookie but, when you bite, releases a burst of cold, creamy goodness that doesn’t melt away instantly. Most recipes get this completely wrong—either they over‑mix the ice cream, causing it to melt during baking, or they under‑bake the cookies, leaving them doughy. This method sidesteps both pitfalls and delivers a dessert that’s crisp on the outside, dreamy in the middle, and downright addictive.
I dare you to taste this and not go back for seconds; the combination is so addictive that you’ll find yourself planning your next batch before the first one even finishes. Okay, ready for the game‑changer? In the next sections I’ll walk you through every single step—why each ingredient matters, how to master the double‑chill, and the little tricks that turn a good bar into the best version you’ll ever make at home. By the end, you’ll wonder how you ever settled for ordinary cookies or plain ice cream. Let me walk you through every single step — by the end, you'll wonder how you ever made it any other way.
What Makes This Version Stand Out
- Texture: The cookie base is baked just enough to stay soft‑chewy, while the ice‑cream core stays firm enough to hold its shape, creating a contrast that’s as satisfying as a crunchy‑soft sandwich.
- Flavor Depth: A pinch of sea salt on the dough amplifies the chocolate, and the vanilla ice cream adds a buttery richness that you won’t find in ordinary cookie‑ice‑cream combos.
- Simplicity: Despite the impressive result, the ingredient list is pantry‑friendly and the steps are straightforward—no fancy equipment required.
- Unique Technique: The double‑chill method ensures the ice cream never melts during baking, preserving that luxurious cold center.
- Crowd Reaction: I’ve served these at parties and watched guests line up for seconds; the “wow” factor is off the charts.
- Ingredient Quality: Using high‑quality butter and real vanilla extract makes the cookie taste like it was baked in a bakery, not a dorm kitchen.
- Make‑Ahead Potential: The bars can be prepared a day ahead, frozen, and still taste fresh—perfect for busy weeks or impromptu gatherings.
- Versatility: Swap the vanilla ice cream for mint or coffee, and you’ve got a whole new flavor adventure without changing the core method.
Inside the Ingredient List
The Flavor Base
All‑purpose flour is the backbone of any good cookie, providing structure while allowing the butter to create those melt‑in‑your‑mouth pockets. I use 2 cups of unbleached flour because it has a slightly higher protein content, giving the dough a subtle chew that pairs beautifully with the creamy interior. If you skip the flour or cut the amount in half, the bars will collapse like a house of cards and lose that satisfying bite. For a gluten‑free twist, swap the flour for a 1‑to‑1 gluten‑free blend, but be sure it contains xanthan gum to mimic the elasticity.
The Texture Crew
Butter, melted and slightly cooled, is the secret to that golden, buttery crust that flirts with crispness without turning hard. I recommend using unsalted European‑style butter—its higher butterfat content gives a richer flavor and a silkier mouthfeel. The sugars—half brown, half granulated—play distinct roles: brown sugar adds moisture and a caramel note, while white sugar encourages spread and a light crunch on the edges. Skipping the brown sugar will make the bars taste flat, and using only white sugar can lead to a dry texture. If you’re watching sugar, you can reduce the white sugar by a tablespoon and still retain the perfect balance.
The Unexpected Star
Vanilla ice cream isn’t just a filler; it’s the cool heart that makes every bite a surprise. I soften the ice cream just enough to spread it—about 5 minutes at room temperature—so it lays evenly between the cookie layers without melting. If the ice cream is too warm, it will ooze out during baking; if it’s too cold, it will crack when you slice the bars. For a richer flavor, opt for a premium vanilla bean ice cream, or experiment with salted caramel or espresso‑infused ice cream for a grown‑up twist.
The Final Flourish
Chocolate chips are the finishing touch that turns this from “nice” to “legendary.” I use semi‑sweet chips, 2 cups, because they provide the perfect balance of sweet and bitter. If you prefer a deeper cocoa punch, go for dark chocolate chips with 70% cacao; if you love melty pockets, toss in a handful of mini‑chips that melt faster. A pinch of flaky sea salt sprinkled on top before the final bake adds a pop that makes the chocolate sing.
Everything's prepped? Good. Let's get into the real action...
The Method — Step by Step
Preheat your oven to 350°F (175°C) and line a 9×13‑inch baking pan with parchment paper, letting the excess hang over the sides for easy removal later. While the oven warms, whisk together the flour, baking soda, and salt in a medium bowl; this dry mix ensures even leavening and prevents clumps. I like to sift the flour to aerate it, which gives the final cookie a lighter crumb. Power transition: Okay, ready for the game‑changer?
In a large mixing bowl, combine the melted butter, brown sugar, and white sugar. Beat with a hand mixer on medium speed until the mixture is glossy and the sugars have dissolved—about 2 minutes. The mixture should look like a caramel‑gold river, thick but still pourable. Add the eggs one at a time, beating well after each addition, then stir in the vanilla extract. Watch the texture: If the batter looks too thick, a splash of milk (about a tablespoon) will loosen it without compromising structure.
Gradually fold the dry ingredients into the wet mixture, using a spatula to avoid over‑mixing. You’ll notice the dough becoming slightly sticky; that’s exactly what we want. Once combined, cover the bowl with plastic wrap and chill in the freezer for 30 minutes.
Kitchen Hack: Pop the dough into an ice‑cream scoop for uniform balls; this speeds up the assembly later.While the dough chills, take the vanilla ice cream out of the freezer and let it sit on the counter for about 5 minutes, just until it’s soft enough to spread. Transfer the softened ice cream to a shallow dish and smooth it into an even layer about ½‑inch thick. Watch Out: If the ice cream begins to melt, return it to the freezer for a minute; melted ice cream will seep into the cookie dough and ruin the texture.
Remove the chilled dough from the freezer. Using a cookie scoop, place evenly spaced dough balls onto the parchment‑lined pan, leaving about 2 inches between each. Gently press each ball down with the back of a spoon to form a thin disc, about ¼‑inch thick. These will become the bottom layer of your bars.
Spread the softened ice cream over the dough discs, making sure each disc gets an even blanket of ice cream. If any gaps appear, use a small offset spatula to fill them. Then, take the remaining chilled dough balls, flatten them, and place them on top of the ice‑cream layer, gently pressing to seal the edges. The top layer should be slightly larger than the bottom to create a neat “sandwich” effect.
Sprinkle the chocolate chips evenly over the top layer, pressing them lightly so they adhere. For an extra crunch, add a pinch of flaky sea salt on top of the chips; this contrast is what makes the flavor pop. Slide the pan into the preheated oven and bake for 12‑15 minutes, or until the edges of the cookies turn a light golden brown and the chocolate chips have melted but not browned.
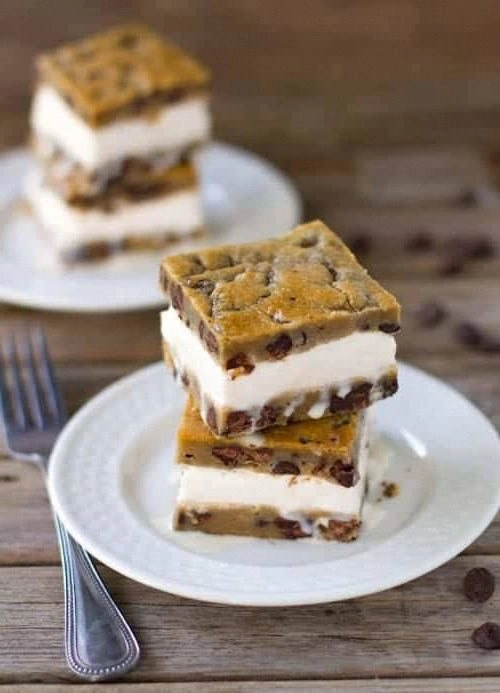
When the timer dings, remove the pan and let it cool on a wire rack for 10 minutes. This brief rest allows the ice cream to firm up again, preventing a messy slice. After cooling, use the overhanging parchment to lift the entire slab onto a cutting board. Slice into bars—8 generous pieces for a crowd or 12 smaller ones for a party.
Serve the bars warm, letting the cookie edges be slightly crisp while the ice‑cream core remains cool. For an extra touch, drizzle a thin ribbon of melted chocolate or a dusting of powdered sugar just before plating. And now the fun part: watch your guests’ faces light up as they bite into that perfect contrast of warm and cold.
That's it — you did it. But hold on, I've got a few more tricks that'll take this to another level...
Insider Tricks for Flawless Results
The Temperature Rule Nobody Follows
Never bake these bars directly from the freezer unless the oven is pre‑heated to a full 350°F. A cold dough will cause the cookies to spread unevenly, resulting in thin edges and a soggy middle. Instead, let the dough sit at room temperature for a quick 5‑minute breath; this tiny adjustment yields a uniform rise and a perfect golden‑brown edge that shatters like thin ice when you bite.
Why Your Nose Knows Best
Your sense of smell is the most reliable indicator that the cookies are done. When the butter‑sugar mixture starts to give off a nutty, caramel aroma, you’re within seconds of perfection. If you wait for the color alone, you risk over‑baking and drying out the ice‑cream core. Trust that toasty scent—it's the secret handshake between you and the oven.
The 5‑Minute Rest That Changes Everything
After you pull the pan from the oven, resist the urge to cut immediately. Let the bars rest for exactly five minutes; this short pause lets the interior ice cream re‑solidify and the cookie edges set. Skipping this rest leads to smudged slices and a melted center that slides off the plate. I once sliced right away and learned the hard way—my friends got more ice cream on the counter than on their plates.
The Double‑Layer Seal
When you press the top dough layer onto the ice‑cream, use the back of a spoon to create a gentle seal around the edges. This prevents the ice cream from leaking during baking and ensures each bite gets an even distribution of cold core. If you leave gaps, the ice cream will seep out, turning the bottom of the pan into a sticky mess.
The Chocolate Chip Distribution Trick
Instead of dumping all the chips at once, sprinkle half before the top dough layer and the remaining half after sealing. This creates pockets of molten chocolate throughout the bar, giving you that surprise “gooey” bite in every mouthful. I’ve seen people skip this step and end up with a flat chocolate taste; the two‑step method guarantees depth.
Creative Twists and Variations
This recipe is a playground. Here are some of my favorite ways to switch things up:
Mint‑Chocolate Fusion
Swap the vanilla ice cream for a mint‑chip version and add a handful of crushed peppermint candies to the top layer. The mint brightens the flavor profile while the chocolate chips keep the classic richness, making it perfect for holiday parties.
Espresso Buzz
Replace half of the vanilla ice cream with a strong espresso‑infused ice cream and sprinkle a pinch of instant coffee granules on the top dough. The bitterness of coffee cuts through the sweetness, delivering a sophisticated dessert for adult gatherings.
Nutty Delight
Fold in ½ cup toasted chopped pecans or walnuts into the cookie dough and drizzle a caramel glaze over the finished bars. The nuts add crunch and a buttery depth that pairs wonderfully with the creamy center.
White Chocolate Raspberry
Use white chocolate chips instead of semi‑sweet and swirl a raspberry coulis into the ice‑cream layer before assembling. The tartness of raspberry balances the sweet white chocolate for a fresh, summer‑ready twist.
Spiced Autumn
Add a teaspoon of pumpkin spice to the dough and use a pumpkin‑flavored ice cream. This variation brings warm spices to the fore, making it a cozy treat for chilly evenings.
Storing and Bringing It Back to Life
Fridge Storage
If you plan to eat the bars within 48 hours, keep them in an airtight container in the refrigerator. The cookies will stay soft, and the ice‑cream core will stay pleasantly cool without turning rock‑hard. For best texture, let the bars sit at room temperature for 5 minutes before serving.
Freezer Friendly
These bars freeze beautifully for up to 2 weeks. Wrap each bar individually in parchment paper, then place them in a zip‑top bag. When you’re ready to enjoy, transfer the bars to the fridge for 30 minutes, then give them a quick 10‑second zap in the microwave to soften the ice‑cream core without melting the cookie.
Best Reheating Method
To revive a frozen bar, preheat your oven to 300°F (150°C) and bake the bar for just 5 minutes. This gently warms the cookie exterior while the ice‑cream stays semi‑solid. For an extra touch, add a tiny splash of water (about a teaspoon) to the bottom of the pan; the steam helps the ice‑cream regain its silky texture.