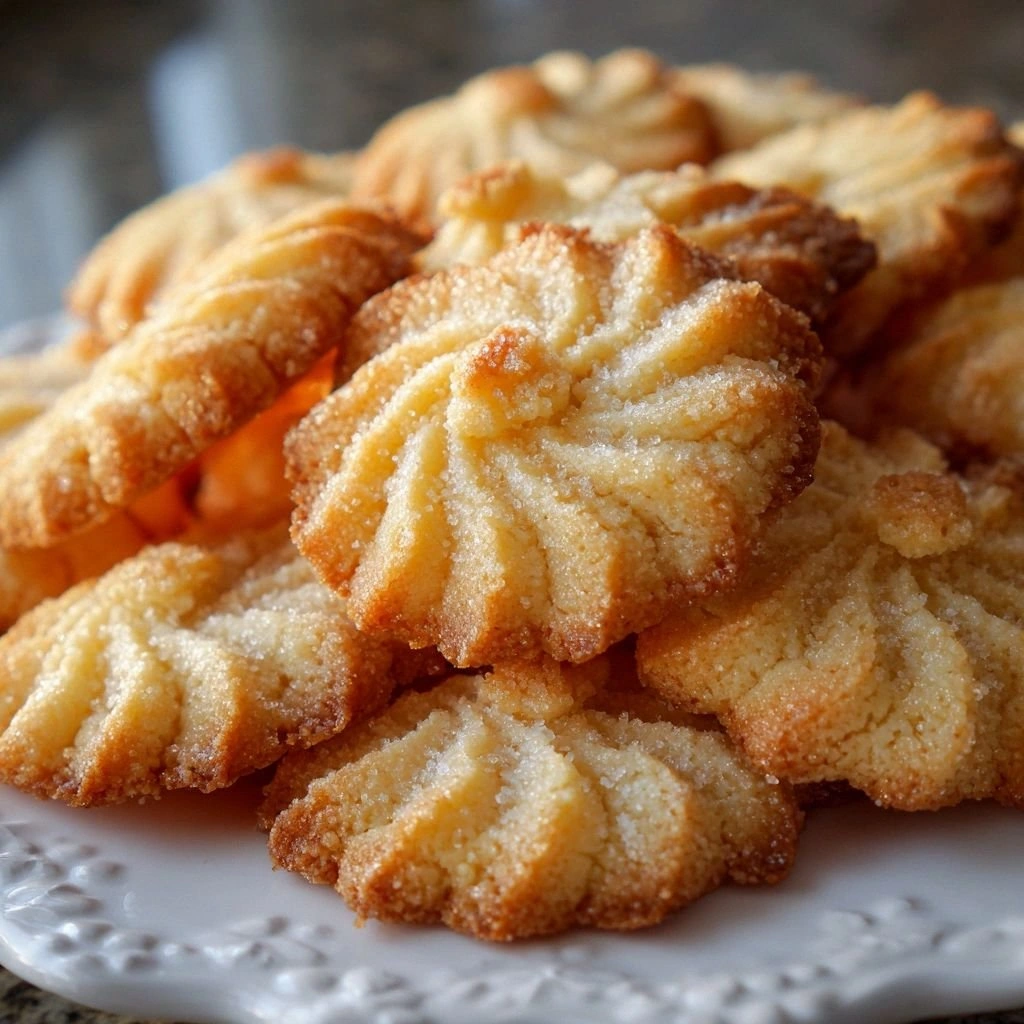
Picture this: a Saturday afternoon, the kitchen lights dimming as the rain taps a steady rhythm against the window. I was halfway through a batch of over‑soft cookies that had turned into a sticky, greasy slab, and my friend dared me to whip up something that would actually taste like a buttery cloud. I stared at the melted butter, the flour, the sugar, and the silence that filled the room, and I thought, “This is where the magic begins.” That single moment sparked a quest for the ultimate Danish butter cookie, a recipe that would make the kitchen smell like a summer bakery and the dough feel like a buttery hug.
I’m not just talking about any cookie. I’m talking about a cookie that balances sweetness and richness, a cookie that has crisp edges that shatter like thin ice while the center remains tender, and a cookie that carries the subtle warmth of vanilla and almond. The aroma alone can transport you to a cozy Scandinavian home, the sound of the dough being rolled is like a metronome keeping time with your heartbeat. The texture, the mouthfeel, the way the butter melts in your mouth—these are the sensations that will keep you coming back for seconds, and maybe even thirds, even though I dare you to taste this and not go back for seconds.
Most cookie recipes get this completely wrong. They either end up too crumbly, too sweet, or the butter melts away before you can get that signature buttery bite. What sets this version apart is the careful balance of ingredients, the precise temperature control, and the little hacks that elevate the dough from simple to sublime. I’ve spent countless hours tweaking ratios, testing baking times, and experimenting with the right amount of almond to give that nutty whisper without overpowering the vanilla. The result? A cookie that is hands down the best version you’ll ever make at home.
Picture yourself pulling these golden discs from the oven, the whole kitchen smelling incredible, the timer buzzing, and the anticipation of that first bite building to a crescendo. You’ll see the dough rise just enough, the edges will start pulling away, and the center will remain perfectly tender. The moment you take a bite, the butter will melt, the sugar will dissolve, and the almond will give a subtle, nutty echo. Let me walk you through every single step—by the end, you’ll wonder how you ever made it any other way.
What Makes This Version Stand Out
- Flavor: The combination of unsalted butter and almond extract creates a depth of flavor that’s unmistakably buttery with a hint of nutty warmth. The vanilla extract adds a sweet, aromatic undertone that balances the richness of the butter. Together, they form a flavor profile that’s both comforting and indulgent, making every bite a sensory delight.
- Texture: The precise ratio of butter to flour ensures a crisp edge while maintaining a soft, chewy center. The dough’s consistency is achieved through a meticulous creaming process that incorporates air, giving the cookies a lightness that contrasts beautifully with their buttery richness. The result is a cookie that melts in your mouth without feeling heavy or greasy.
- Simplicity: With only six core ingredients, this recipe is approachable for both novice bakers and seasoned pros. Each ingredient plays a distinct role, and there are no hidden tricks or obscure pantry staples. The straightforward method allows you to focus on technique rather than juggling complex steps.
- Uniqueness: The subtle almond extract is the secret twist that sets these cookies apart from the usual butter cookie. It adds an unexpected layer of flavor that elevates the dough from ordinary to extraordinary. This small addition makes the cookie memorable and distinguishes it from the crowd.
- Crowd Reaction: Friends and family always ask for the recipe after tasting these cookies, and many admit they never had a cookie that could compete with the buttery, nutty flavor. The cookies are a hit at gatherings, and the aroma alone can bring a room together. They’re perfect for holidays, parties, or just a quiet afternoon snack.
- Ingredient Quality: Using high‑quality unsalted butter and fresh vanilla extract is essential for the best flavor. The butter’s creamy texture and the vanilla’s aromatic profile are the backbone of this recipe. Skimping on quality here would result in a cookie that lacks depth and richness.
- Cooking Method: The method emphasizes gentle creaming, precise chilling, and careful baking. Each step is designed to lock in flavor, control moisture, and ensure even browning. The process is straightforward yet precise, allowing you to master the art of buttery cookie baking.
- Make‑Ahead Potential: These cookies freeze beautifully, and you can bake them in advance for a quick snack or gift. The dough holds its shape during freezing, and the cookies reheat to their original buttery glory. This makes the recipe perfect for busy weeks or for preparing treats ahead of time.
Inside the Ingredient List
The Flavor Base
Unsalted butter is the star of the show. Softened butter gives these cookies their rich, creamy flavor and allows the dough to develop a delicate crumb. If you use salted butter, you’ll end up with an overly salty cookie that masks the subtle vanilla notes. For the best results, let the butter sit at room temperature until it’s pliable but not melted.
Granulated sugar is the sweetener that not only adds sweetness but also helps create that desirable golden crust. It dissolves during the creaming process, incorporating air that gives the cookies a tender texture. Skipping sugar or using an alternative sweetener will alter the cookie’s structure and flavor profile, so keep it on the list.
Vanilla extract is a classic flavoring that adds warmth and depth. It’s the subtle background that brings the butter and almond together, creating an aromatic harmony. A high‑quality vanilla extract will give you the most pronounced flavor; a low‑grade extract can feel flat or chemical.
The Texture Crew
All‑purpose flour is the foundation of the cookies, providing structure while keeping them light and tender. The protein content of the flour determines the cookie’s chewiness, so choose a standard all‑purpose flour for the best balance. If you use bread flour, the cookies may turn out too chewy; if you use cake flour, they may crumble too easily.
Salt is a pinch that enhances the flavors, balancing the sweetness beautifully. It brings out the butter’s richness without making the cookie taste salty. Be careful not to over‑salt; a small pinch is all you need to elevate the taste.
Almond extract is a little goes a long way. It adds a lovely nutty note that complements the vanilla and butter. The almond flavor should be subtle, not overpowering; start with a small amount and adjust to taste.
The Unexpected Star
A splash of cold water can help bring the dough together if it feels too dry. Water hydrates the flour and activates gluten, which contributes to a tender crumb. Use just enough to allow the dough to bind without becoming sticky.
A pinch of baking powder can be added if you want a slightly lighter cookie. Baking powder introduces a gentle lift, but it’s optional; the classic recipe works wonderfully without it. If you do add it, use no more than 1/4 teaspoon to keep the flavor profile intact.
The Final Flourish
A few drops of lemon zest can brighten the flavor profile, adding a subtle citrus note that cuts through the richness. This is an optional variation that adds a fresh twist to the classic. If you’re not a fan of citrus, you can skip it or substitute with orange zest for a different flavor.
A dusting of powdered sugar after baking gives a delicate sweetness and a visually appealing finish. It also adds a slight crunch when the cookies are fresh. If you prefer a plain finish, simply omit the sugar dusting.
Everything’s prepped? Good. Let’s get into the real action.
The Method — Step by Step
- Begin by preheating your oven to 350°F (175°C) and lining two baking sheets with parchment paper. While the oven warms, place the butter in a large mixing bowl and allow it to soften at room temperature. You’ll want the butter to be pliable but not melted; this ensures the dough will incorporate air properly. Once softened, add the granulated sugar and start beating on medium speed until the mixture is light and fluffy. The goal is to trap air for a tender crumb, so give it a few minutes of patience. When the mixture looks pale and airy, you’ve hit the sweet spot.
- Add the vanilla and almond extracts to the creamed butter, stirring until the liquids are fully incorporated. The aromatic oils should mingle, creating a fragrant base that will carry through the baking process. The almond extract should be added slowly to avoid a strong, overpowering flavor. Once the extracts are blended, you’ll notice the dough’s aroma becoming more complex, hinting at the final flavor profile. This step is crucial for achieving that buttery, nutty harmony.
- Sift the all‑purpose flour and salt together in a separate bowl to eliminate any clumps. Sifting also aerates the flour, which contributes to a lighter texture in the finished cookies. Gently fold the dry mixture into the wet ingredients using a spatula, mixing just until the dough comes together. Over‑mixing can develop gluten, making the cookies tough, so stop as soon as the dough is cohesive. The dough should be slightly sticky but manageable, a sign that the ratio is correct.
- Turn the dough onto a lightly floured surface and knead it lightly just enough to bring it together. The goal is to achieve a smooth, pliable dough without overworking it. Pat the dough into a 1/2‑inch thick rectangle, then wrap it tightly in plastic wrap. Chill the dough in the refrigerator for at least 30 minutes; this firming step prevents the cookies from spreading too much during baking. The chilled dough will also help the butter maintain its structure, ensuring crisp edges.
- Using a cookie cutter or a small glass, cut out rounds from the chilled dough. Aim for a uniform size so they bake evenly. Gently place the rounds onto the prepared baking sheets, leaving about 2 inches between each cookie. The spacing allows the cookies to expand slightly without merging. If you prefer a thicker cookie, roll the dough to 3/4‑inch thickness and adjust accordingly.
- Bake the cookies in the preheated oven for 12–14 minutes, or until the edges are golden brown and the centers look set. The cookies should smell toasty, and the aroma should fill the kitchen. Watch closely during the last few minutes; a slight browning of the edges indicates they’re ready. Remove them from the oven and let them rest on the baking sheet for 5 minutes before transferring to a wire rack.
- While the cookies are still warm, dust them lightly with powdered sugar if desired. This adds a subtle sweetness and a touch of elegance. Allow the sugar to set for a minute before moving them to the wire rack. The sugar will crystallize slightly, giving the cookies a delicate crunch when you bite into them. Once the sugar has set, let the cookies cool completely on the rack.
- Store the cooled cookies in an airtight container at room temperature for up to one week. The airtight seal preserves the buttery freshness and prevents the cookies from becoming stale. If you want to keep them fresh longer, store them in the refrigerator, but bring them to room temperature before serving to restore their soft texture. When you’re ready to enjoy them, a quick toast in the oven at 300°F for 5 minutes will revive their crispness.
That’s it—you did it. But hold on, I’ve got a few more tricks that will take this to another level.
Insider Tricks for Flawless Results
The Temperature Rule Nobody Follows
Many bakers overlook the importance of room‑temperature ingredients. The butter must be soft enough to fold into the sugar without melting, but not so warm that it becomes greasy. If your kitchen is warm, chill the dough for an extra hour to ensure the butter stays firm. This small adjustment can mean the difference between a perfect cookie and a soggy mess.
Why Your Nose Knows Best
During baking, the aroma of the cookies is a reliable indicator of doneness. When the scent is buttery and slightly nutty, the cookies are ready to go. If you’re in doubt, give them a quick sniff; the aroma should be inviting, not burnt. A strong, sweet smell is a sign that the sugar is caramelizing just right.
The 5‑Minute Rest That Changes Everything
Letting the cookies rest on the baking sheet for five minutes before moving them to a wire rack is crucial. This pause allows the cookies to finish cooking from residual heat and helps the edges set. If you rush them off the sheet, they may be too soft and spread further. The brief rest also gives the powdered sugar, if used, time to set.
The Secret of Even Spacing
Spacing the cookie rounds evenly on the sheet ensures they bake at the same rate. Too close together, and they’ll fuse; too far apart, and the oven’s heat will be uneven. Mark a grid on the sheet with a light dusting of flour or use a cookie cutter with a built‑in spacing guide. This simple trick guarantees uniformity.
The Sweetness Balance
If you find the cookies too sweet, reduce the sugar by 10%. Conversely, if they’re not sweet enough, add a tablespoon more sugar. The key is to taste the dough before baking; a quick spoonful will give you a good idea of the final flavor. Adjusting the sweetness early on saves you from a batch that’s off‑balance.
The Final Flourish
A quick dusting of sea salt on the top of each cookie before baking can elevate the flavor profile. The salt caramelizes slightly, adding a savory contrast to the buttery sweetness. Use a fine sea salt and sprinkle sparingly to avoid overpowering the cookie.
Creative Twists and Variations
This recipe is a playground. Here are some of my favorite ways to switch things up:
Chocolate‑Dusted Delight
After baking, roll the cookies in cocoa powder for a chocolatey twist. The cocoa adds a rich, bittersweet flavor that pairs wonderfully with the buttery base. Serve them with a glass of milk for a nostalgic treat. This variation is perfect for chocolate lovers who want something a bit more sophisticated.
Citrus‑Infused Bliss
Add a tablespoon of lemon zest to the dough for a bright, citrusy kick. The lemon zest cuts through the richness, giving the cookies a fresh lift. Pair them with a cup of tea or coffee for a balanced flavor profile. This variation works especially well during spring and summer.
Nutty Crunch Edition
Fold in a handful of chopped toasted almonds or walnuts before baking. The nuts add a delightful crunch and a nutty depth that complements the almond extract. The result is a cookie that’s both buttery and textured. Great for those who love a mix of flavors and textures.
Honey‑Glazed Surprise
Drizzle a thin layer of honey over the cooled cookies. The honey adds a natural sweetness and a glossy finish. The glaze also helps preserve the cookies’ freshness for a longer time. This version is ideal for those who prefer a touch of natural sweetness over refined sugar.
Spiced Winter Edition
Stir in a pinch of ground cinnamon and nutmeg to the dough for a warm, spiced flavor. The spices bring a cozy, holiday vibe to the cookies. Serve them with a mug of hot chocolate for a comforting treat. This variation is perfect for chilly evenings or holiday gatherings.
Storing and Bringing It Back to Life
Fridge Storage
Place the cookies in an airtight container in the refrigerator for up to two weeks. The cool environment keeps the butter from softening too quickly, preserving the crisp edges. Before serving, let the cookies sit at room temperature for 10 minutes to restore their softness. This method is ideal for those who bake in bulk and want to enjoy the cookies over several days.
Freezer Friendly
Wrap the cooled cookies tightly in plastic wrap, then place them in a freezer‑proof bag. They will stay fresh for up to three months. When you’re ready to enjoy them, thaw them at room temperature for 30 minutes. The cookies will retain their buttery flavor and crispness, making them a convenient treat for busy days.
Best Reheating Method
Preheat your oven to 300°F (150°C) and bake the frozen cookies for 8–10 minutes. The low temperature ensures the cookies heat evenly without burning. Add a tiny splash of water to the bottom of the baking sheet to create steam, which keeps the cookies moist and fresh. This simple trick will revive the cookies to their original buttery glory.