When the oven door swung open, I expected the usual stale, flat cake that had haunted my kitchen for weeks. Instead, a fragrant plume of dark chocolate and roasted espresso rose, curling like a mischievous smoke ring. My taste buds tingled, and I felt the instant urge to taste this and not go back for seconds. I had been chasing the perfect chocolate cake for months, but every recipe seemed to fall short of the velvety, airy dream that I imagined. This time, the scent alone promised a revelation.
Picture yourself pulling this out of the oven, the whole kitchen smelling incredible, the heat humming like a contented cat. The batter swirls with glossy cocoa, the edges crisp yet tender, the center moist enough to melt in your mouth. My friend dared me to share this recipe, and I couldn't resist. I have never tasted a cake that feels like a hug wrapped in chocolate. The first bite is a cascade of rich sweetness, followed by a subtle espresso kick that wakes your palate. If you've ever struggled with a cake that feels heavy, you’re not alone — and I've got the fix.
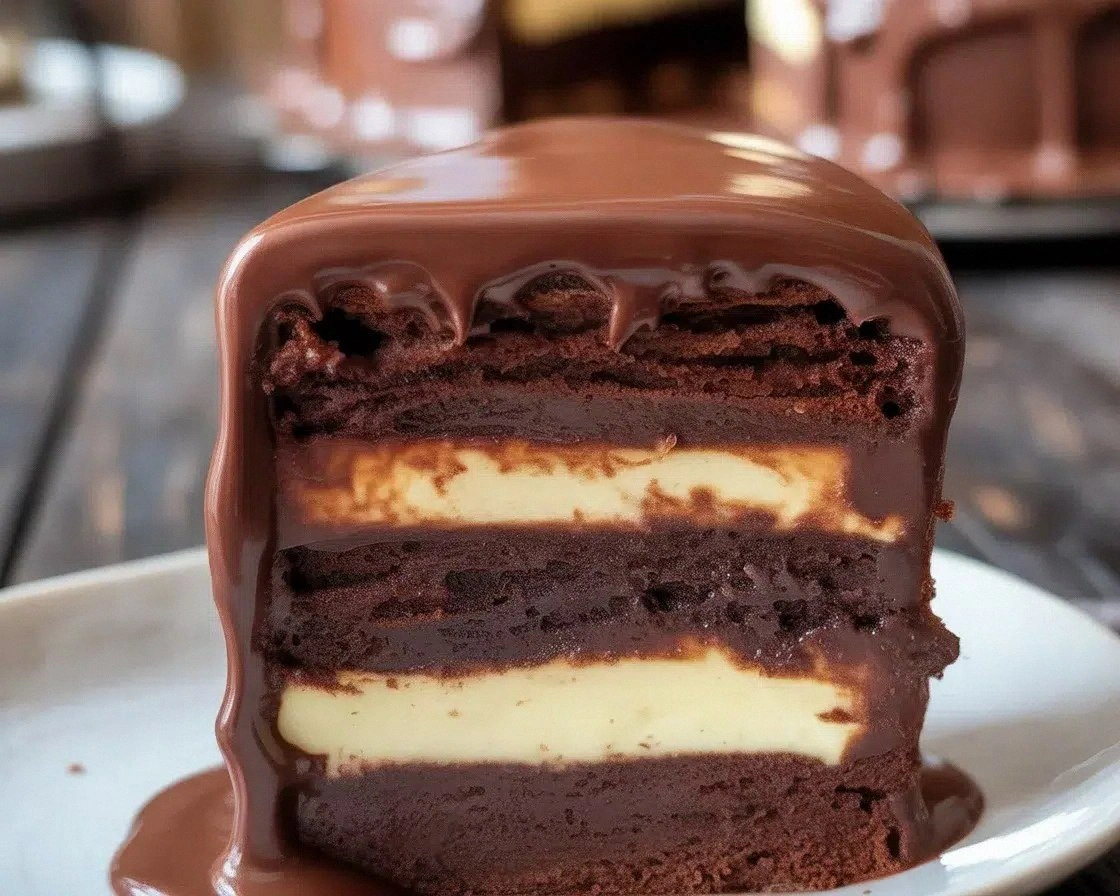
What makes this version stand out is its unapologetic depth: a single jar of raspberry jam tucked into the center, a sprinkle of espresso powder that deepens the cocoa, and walnuts that add a satisfying crunch. The batter is a carefully balanced mixture of flour, sugar, and cocoa that yields a moist crumb without the dreaded dry, crumbly texture. I dare you to taste this and not go back for seconds. I’ll be honest — I ate half the batch before anyone else got to try it. The result is a cake that is hands down the best version you'll ever make at home.
Most recipes get this completely wrong by overmixing or underbaking. Here’s what actually works: keep the batter smooth, bake at a moderate temperature, and let it rest before slicing. I’ve spent years tweaking the ratio of cocoa to flour to achieve the perfect balance between richness and structure. The addition of espresso powder isn’t just a gimmick; it unlocks the chocolate’s full depth, making each bite feel like a secret indulgence. This next part? Pure magic. Stay with me here — this is worth it.
Before we dive into the ingredients, let’s talk about the atmosphere. Imagine a quiet kitchen, the oven preheating to 350°F, the timer ticking down, and the faint hum of the refrigerator. The air is thick with anticipation, the kind that makes you pause and savor the moment before the first spoonful. The cake’s aroma will linger, drawing friends and family closer. The sound of the timer beeping will become a soundtrack to your culinary triumph. That sizzle when it hits the pan? Absolute perfection.
Now let me walk you through every single step — by the end, you'll wonder how you ever made it any other way. I’ll guide you through the ingredient selection, the mixing process, the baking technique, and the finishing touches that elevate this cake from ordinary to extraordinary. Each step is designed to be intuitive, yet it carries the weight of experience. You’ll learn how to handle the batter like a pro, how to judge doneness by smell and touch, and how to finish with a glossy glaze that glistens like liquid chocolate. Ready? Let’s begin.
What Makes This Version Stand Out
Depth: The espresso powder amplifies the cocoa’s flavor, creating a layered taste that lingers on the palate.
Texture: A moist crumb paired with a slightly crisp exterior provides a delightful contrast that satisfies both soft and crunchy cravings.
Ingredient Quality: Using unsweetened cocoa and premium chocolate chips ensures a rich, authentic chocolate experience.
Visual Appeal: The glossy glaze and walnut garnish add a professional finish that looks as good as it tastes.
Ease: The recipe requires minimal equipment and straightforward techniques, making it accessible for both novice and seasoned bakers.
Make‑Ahead: The cake can be assembled and refrigerated for up to 48 hours, allowing you to serve it fresh without last‑minute prep.
Alright, let's break down exactly what goes into this masterpiece...
Inside the Ingredient List
The Flavor Base
Unsweetened cocoa powder is the backbone of this cake, providing the deep, bittersweet foundation that defines chocolate. It also contributes to the cake’s density, ensuring a firm yet tender crumb. Skipping cocoa would render the cake bland and lifeless, stripping it of its signature richness. If you’re allergic to cocoa or prefer a lighter flavor, you can substitute with a high‑quality dark chocolate, melted and strained to a smooth paste.
Vanilla extract adds warmth and complexity, balancing the bitterness of the cocoa. A single teaspoon can make a noticeable difference; however, if you’re short on vanilla, a splash of almond or hazelnut extract can offer a subtle twist. Choosing an organic, pure vanilla extract over a synthetic one will elevate the overall taste profile. A good rule of thumb: use fresh vanilla beans for an extra aromatic punch.
Espresso powder is the secret weapon that deepens the chocolate flavor without the coffee aftertaste. It reacts with the cocoa to release latent flavors, creating a multi‑dimensional taste experience. If you don’t have espresso powder, a small amount of instant coffee can work, but it may alter the texture slightly. Remember, espresso powder is more potent than brewed coffee, so use it sparingly.
The Texture Crew
All‑purpose flour provides structure and helps the cake rise. It’s essential to sift the flour to eliminate lumps and ensure a silky batter. If you prefer a gluten‑free version, a blend of rice flour, potato starch, and tapioca flour can mimic the same lightness.
Granulated sugar not only sweetens the cake but also contributes to the tender crumb through a process called sugar inversion. Over‑sugar the batter, and it will become too dense; under‑sugar, and it will lack the necessary moisture. For a slightly healthier option, you can replace half the sugar with a natural sweetener like maple syrup, but adjust the liquid accordingly.
Unsalted butter is the fat that gives the cake its buttery richness and helps create a fine crumb. Butter should be at room temperature before mixing; otherwise, it will separate and create an uneven batter. If you’re vegan, a neutral oil like sunflower or canola can substitute, but the flavor will be noticeably different.
The Unexpected Star
Walnuts add a crunchy contrast and a subtle nutty flavor that complements the chocolate. They also provide healthy fats and a bit of protein, making the cake a bit more balanced. If you’re allergic to nuts, chopped almonds or pecans can replace walnuts, though the texture will differ slightly. Toasting the walnuts before adding them to the batter enhances their flavor, giving the cake a deeper, caramelized note.
Chocolate chips are the star of the show, creating pockets of molten chocolate that melt in your mouth. Use high‑quality dark chocolate chips to maintain consistency in flavor. If you prefer a lighter chocolate, use semi‑sweet chips, but the overall richness will be reduced. Adding a pinch of sea salt on top of the glaze can accentuate the chocolate’s sweetness.
The Final Flourish
Raspberry jam is the hidden gem that provides a burst of tartness, cutting through the sweetness and adding a fruity dimension. It also creates a beautiful swirl in the center of the cake, making it visually appealing. If you’re craving a different flavor, try blueberry jam or a swirl of caramel.
Baking powder is the leavening agent that ensures the cake rises evenly. It reacts with the acidic cocoa to create carbon dioxide bubbles, giving the cake its airy structure. A pinch of baking soda can also be added for extra lift, but be careful not to over‑bake.
Salt is essential for balancing flavors and enhancing sweetness. It brings out the chocolate’s depth and prevents the cake from tasting flat. A teaspoon is the right amount for this recipe; too much will make the cake taste salty.
Everything's prepped? Good. Let's get into the real action...
The Method — Step by Step
- Preheat your oven to 350°F (175°C) and line a 9‑inch cake pan with parchment paper. Grease the pan lightly with butter to ensure easy release. The parchment should be cut to fit snugly inside the pan, preventing sticking. This step is crucial for a uniform bake. Keep the oven door closed until the cake is done to maintain temperature.
- In a large bowl, whisk together the flour, cocoa, baking powder, and salt until well combined. The dry mix should be smooth and free of lumps. This ensures even distribution of leavening agents. The mixture should feel light to the touch. Use a whisk or a fork for a quick blend.
- In a separate bowl, cream the butter and sugar together until pale and fluffy, using an electric mixer on medium speed. This process incorporates air, giving the cake lift. Stop when the mixture is light and airy. The texture should resemble whipped cream. Avoid over‑creaming to keep the batter from becoming too dry.
- Add the eggs one at a time, beating well after each addition. The batter should thicken slightly with each egg. Ensure each egg is fully incorporated before adding the next. This step helps create a smooth, cohesive batter. The mixture should feel silky.
- Fold in the dry mixture and vanilla, mixing until just combined. Overmixing can develop gluten, resulting in a tough cake. The batter should be thick yet pourable. Use a spatula to gently fold the mixture, keeping the batter light. The batter should hold its shape but not be clumpy.
- Fold in the walnuts and chocolate chips, distributing them evenly throughout the batter. The nuts should be visible, giving the cake a textural contrast. The chocolate chips should be evenly spread. The batter should still be smooth. Avoid over‑mixing after adding these ingredients.
- Pour the batter into the prepared pan, smoothing the top with a spatula. Gently tap the pan on the counter to release air bubbles. The batter should spread evenly across the pan. The edges should be slightly higher than the center. This helps create an even rise.
- Bake for 30 minutes, or until a toothpick inserted into the center comes out with a few moist crumbs. The cake should have a slight crackle on top. Do not open the oven door during the first 20 minutes to avoid temperature fluctuations. Let the cake cool in the pan for 10 minutes before transferring to a wire rack.
- While the cake cools, prepare the raspberry jam swirl. Warm the jam in a small saucepan over low heat, stirring until it becomes liquid. This makes it easier to swirl into the cake. Let it cool slightly before using. The jam should be pourable but not too runny.
- Once the cake has cooled, use a serrated knife to cut a shallow channel through the center. Swirl the warm jam into the channel, creating a marbled effect. The jam should be evenly distributed but still visible. This adds a burst of tartness to each bite. The cake now looks like a chocolate river.
- For the glaze, melt the chocolate chips and butter together in a double boiler until smooth. Stir until glossy. Let it cool slightly before drizzling over the cake. The glaze should coat the cake like velvet. Finish with a dusting of powdered sugar for an elegant touch.
- Let the glaze set for 10 minutes before slicing. The cake should feel firm enough to hold its shape. Serve immediately or refrigerate for later. The cake remains moist for up to 48 hours when stored properly. Enjoy the rich, complex flavors.
That's it — you did it. But hold on, I've got a few more tricks that'll take this to another level...
Insider Tricks for Flawless Results
The Temperature Rule Nobody Follows
Many bakers bake at 375°F, assuming higher heat means faster rise. In reality, 350°F allows the cake to cook evenly, preventing a dry exterior. Use a calibrated oven thermometer to confirm the actual temperature. This small adjustment can save your cake from becoming brittle.
Why Your Nose Knows Best
As the cake bakes, the aroma will evolve from sweet to nutty to slightly burnt. Trust this scent; if it starts smelling overly burnt, lower the oven temperature by 25°F. The scent is a reliable indicator of doneness, more accurate than a timer alone.
The 5‑Minute Rest That Changes Everything
After removing the cake from the oven, let it rest in the pan for 5 minutes before transferring. This rest period allows the cake to set, reducing the risk of cracks. The residual heat will finish the cooking process without overbaking.
Using a Kitchen Scale for Precision
Measuring ingredients by weight rather than volume eliminates errors. A 1‑cup measurement can vary based on how the cup is packed. Weighing ensures consistent results every time.
Storing the Batter for Freshness
If you’re short on time, you can refrigerate the batter for up to 24 hours. Stir before baking, as the ingredients may separate slightly. Baking from a chilled batter can yield a denser crumb, so adjust the baking time accordingly.
Creative Twists and Variations
This recipe is a playground. Here are some of my favorite ways to switch things up:
Chocolate‑Berry Fusion
Swap the raspberry jam for a mix of fresh strawberries and blueberries. The berries add a fresh, juicy contrast that brightens the chocolate. Use a puree for a smoother swirl. This version is perfect for summer gatherings.
Nutty Delight
Replace walnuts with chopped pecans or hazelnuts. The different nut flavors will change the cake’s profile, giving it a new dimension. Toast the nuts beforehand for extra crunch.
Spiced Variation
Add a pinch of cinnamon or cardamom to the dry mix. The warm spices complement the chocolate and espresso. This variation works wonderfully during the fall season.
Low‑Sugar Option
Reduce the sugar by 25% and add a tablespoon of molasses for depth. The molasses introduces a caramel flavor that balances the sweetness. The cake remains moist and rich.
Vegan Version
Replace butter with coconut oil and use a plant‑based milk. Substitute eggs with flaxseed meal or chia pudding. The texture will be slightly denser, but the flavor stays robust.
Garnish Upgrade
Top the finished cake with a dusting of sea salt and a drizzle of dark chocolate ganache. The salt enhances the chocolate’s sweetness, while the ganache adds an extra layer of decadence. This final touch elevates the cake to dessert‑restaurant quality.
Storing and Bringing It Back to Life
Fridge Storage
Wrap the cooled cake tightly in plastic wrap and place it in the refrigerator for up to 48 hours. The wrap prevents moisture loss and keeps the cake fresh. When ready to serve, let it sit at room temperature for 15 minutes.
Freezer Friendly
For longer storage, wrap the cake in parchment paper, then place it in a freezer bag. Freeze for up to 3 months. Thaw overnight in the refrigerator before reheating. The cake’s texture remains intact.
Best Reheating Method
Reheat in a preheated 300°F oven for 10 minutes, or until warm. Add a splash of water to the pan before reheating to create steam, which keeps the cake moist. Let it cool slightly before slicing.