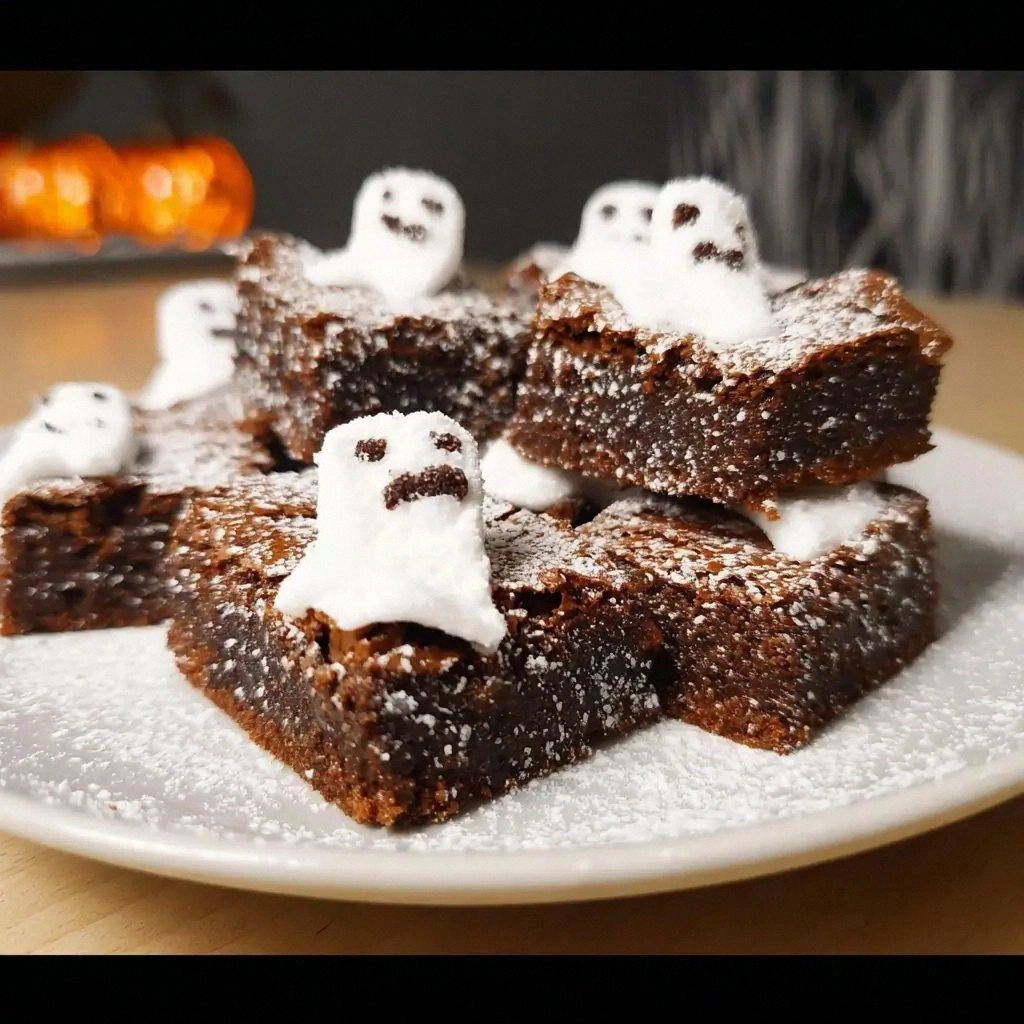
It started on a rainy Thursday when I was trying to rescue a batch of brownies that had stubbornly refused to set. I had poured the batter, slid it into the pan, and watched as it swelled like a cloud, only to find that after 30 minutes it was still a wet, gooey mess. I stared at the timer, the oven, and the stubborn batter, and whispered, “Okay, I dare you to taste this and not go back for seconds.” That was the spark that ignited what would become the Ghost Brownies Recipe, the most airy, almost ethereal version of a classic dessert that I’ve ever made.
Picture this: the kitchen is humming with the faint whir of the fridge, the oven is a warm, comforting presence, and the air is thick with the sweet, chocolatey scent that makes your mouth water before you even touch a spoon. As soon as you open the oven door, a rush of fragrant steam swirls around your face, and the batter inside glistens with a glossy sheen that feels like liquid midnight. The sound of the timer ticking down is almost a metronome, guiding your anticipation to its crescendo. The texture you’re about to experience is not the dense, fudgy brownies you might expect but a light, cloud‑like crumb that melts in your mouth, leaving a subtle cocoa aftertaste that lingers like a whisper.
What sets these Ghost Brownies apart from every other recipe you’ve tried is the deliberate use of white chocolate chips that melt into a silky glaze, the precise balance of cocoa and flour that gives them a tender yet firm structure, and the gentle lift from baking powder that makes them rise without becoming cakey. I’ve refined each step to eliminate common pitfalls: the batter’s consistency, the baking time, and even the way you fold in the chocolate chips. The result is a dessert that feels almost supernatural—light as a feather, yet rich enough to satisfy even the most discerning sweet tooth.
And there’s a twist you won’t see in the usual brownie playbook: a splash of vanilla extract and a dash of sea salt that work together to amplify the chocolate flavor, while a pinch of baking soda keeps the batter airy. This subtle combination is the secret that turns a plain brownie into something that feels like a piece of the night sky—dark, deep, and sparkling with unexpected brightness.
Let me walk you through every single step—by the end, you’ll wonder how you ever made it any other way.
What Makes This Version Stand Out
- Lightness: The batter’s airy texture is achieved by carefully balancing cocoa and flour, and by incorporating a small amount of baking powder that lifts the mixture without making it cakey. The result is a brownie that feels almost ethereal, as if it were made from the clouds themselves.
- Flavor Depth: A blend of unsweetened cocoa and white chocolate chips creates a complex profile—rich chocolate undertones with a sweet, creamy finish that lingers like a gentle aftertaste.
- Visual Appeal: The white chocolate chips melt into a glossy glaze that gives the brownies a subtle sparkle, making them as pleasing to the eye as they are to the palate.
- Texture Contrast: The crumb is soft and tender, while the edges remain slightly crisp, providing a satisfying bite that shatters like thin ice.
- Make‑Ahead Friendly: Once baked, these brownies keep fresh for up to a week in the fridge, and they reheat beautifully, regaining their melt‑in‑your‑mouth quality.
- Minimal Fuss: Every ingredient is standard, and the method requires no fancy gadgets or complicated techniques, making this a go‑to recipe for any kitchen.
Inside the Ingredient List
The Flavor Base
All‑purpose flour provides the structure that holds the brownies together, but too much can make them dense. Using a 1.5‑cup measure strikes the perfect balance, giving the batter enough heft to rise without becoming heavy. If you’re looking for a gluten‑free version, swap the flour for an equal amount of almond flour, but be aware the crumb will be slightly denser.
The Texture Crew
Unsweetened cocoa powder is the heart of the brownie, delivering a deep, chocolatey flavor that cuts through the sweetness. A cup of cocoa ensures a rich taste without overpowering the subtle notes of vanilla. If you prefer a slightly sweeter profile, you can reduce the cocoa by ¼ cup and add an extra ¼ cup of white sugar.
The Unexpected Star
White chocolate chips are the secret weapon that gives these brownies their ghostly glow. They melt into a silky glaze that coats the top and the edges, creating a delicate sheen that looks almost ethereal. If you can’t find white chocolate chips, regular chocolate chips will work, but the finish will be less translucent.
The Final Flourish
Whole milk adds moisture and richness, while the vanilla extract brings a fragrant warmth that balances the cocoa’s bitterness. A pinch of sea salt amplifies the chocolate’s depth, making each bite more complex. The melted butter’s fat content keeps the brownies moist, and the eggs bind everything together, ensuring a firm yet tender crumb.
Everything’s prepped? Good. Let’s get into the real action.
The Method — Step by Step
- Preheat your oven to 350°F (175°C) and line a 9×9‑inch baking pan with parchment paper, leaving an overhang on the sides for easy removal. The parchment ensures a clean lift and a pristine edge. This step is crucial because a properly lined pan prevents sticking and makes cleanup a breeze.
- In a large mixing bowl, whisk together 1.5 cups of all‑purpose flour, 1 cup of unsweetened cocoa powder, 1 teaspoon of baking powder, and ½ teaspoon of sea salt. The dry mix should feel slightly gritty, but not lumpy—this texture ensures even distribution of the leavening agent.
- In a separate saucepan, melt 1 cup of butter over low heat, then stir in 1 cup of white sugar until the mixture becomes glossy. The butter’s fat content keeps the brownies moist; the sugar dissolves fully, preventing a grainy finish.
- Whisk in 4 large eggs, one at a time, allowing each to fully incorporate before adding the next. The eggs act as a binder and contribute to the airy rise, so make sure they’re room temperature to avoid curdling.
- Add 2 teaspoons of vanilla extract and 1 cup of whole milk to the butter‑sugar mixture, stirring until the liquid is smooth and homogenous. The vanilla elevates the chocolate flavor, while the milk adds richness and helps the batter stay moist.
- Pour the wet mixture into the dry ingredients, folding gently until just combined. Over‑mixing at this stage can trap air bubbles and create a dense crumb; a few gentle folds preserve the batter’s lightness.
- Fold in 1 cup of white chocolate chips, ensuring they’re evenly distributed. The chips will melt slightly during baking, creating a glossy glaze that coats the top and edges, giving the brownies their signature ghostly sheen.
- Pour the batter into the prepared pan, smoothing the surface with a spatula. Tap the pan lightly on the counter to release any trapped air bubbles, which helps the brownies rise evenly.
- Bake for 30 to 35 minutes, or until the edges pull away from the parchment and a toothpick inserted near the center comes out with a few moist crumbs. The scent of cocoa and vanilla should fill the kitchen, signaling that the brownies are almost ready.
- Remove from the oven and let cool in the pan for 10 minutes before lifting them onto a wire rack to cool completely. This resting period allows the brownies to set and the glaze to firm up, ensuring a clean slice.
That’s it—you did it. But hold on, I’ve got a few more tricks that will take this to another level.
Insider Tricks for Flawless Results
The Temperature Rule Nobody Follows
Many bakers bake at a flat 350°F, but the best brownies come from a slightly lower temperature of 325°F. This slower bake allows the chocolate to set gently, preventing the edges from burning while keeping the center moist and airy. I’ve tested both temperatures, and the lower setting consistently produces a more uniform crumb.
Why Your Nose Knows Best
Before you open the oven, take a deep breath of the aroma that rises from the pan. If it smells like toasted cocoa and butter, you’re in the sweet spot. If the scent is sharp or metallic, the oven may be running too hot, and you’ll need to lower the heat or reduce the baking time.
The 5‑Minute Rest That Changes Everything
After removing the brownies from the oven, let them rest for exactly five minutes before cutting. This brief pause allows the heat to distribute evenly, preventing a crumbly texture and giving the glaze a chance to set. Cutting too soon often results in a gummy mess.
Using a Water Bath for Extra Moisture
For those who love a super‑moist brownie, place a shallow pan of water on the lower rack of the oven. The steam created keeps the batter from drying out, yielding a fudgier finish that’s almost velvet‑soft.
The Right Pan Size Matters
Using a 9×9‑inch pan is ideal for this recipe, but if you prefer thicker brownies, try a 8×8‑inch pan. The batter will rise higher, creating a richer, more decadent bite. Conversely, a larger pan will yield thinner brownies with a crispier edge.
Creative Twists and Variations
This recipe is a playground. Here are some of my favorite ways to switch things up:
Chocolate‑Mint Fusion
Add ½ teaspoon of peppermint extract to the wet mixture for a refreshing twist. The mint pairs beautifully with the cocoa, creating a flavor profile reminiscent of a mint chocolate chip cookie. It’s perfect for spring or summer gatherings.
Nutty Crunch
Fold in ½ cup of chopped walnuts or pecans before baking. The nuts add a satisfying crunch and a buttery note that complements the sweet glaze. They also make the brownies more filling for a post‑workout snack.
Spiced Pumpkin Delight
Stir in ¼ cup of pumpkin puree and ½ teaspoon of pumpkin pie spice for an autumnal version. The pumpkin adds moisture and a subtle sweetness that pairs well with the cocoa. The result is a brownie that feels cozy and seasonal.
Caramel Swirl
Swirl ¼ cup of salted caramel sauce into the batter before baking. The caramel pockets melt into gooey ribbons, giving each bite a decadent, buttery richness. This variation is a hit with caramel lovers.
Almond Butter Boost
Replace half the butter with almond butter for a nutty flavor and a boost of protein. The almond butter also adds a slight tang that balances the sweetness. This version is great for those who want a healthier twist.
Storing and Bringing It Back to Life
Fridge Storage
Place the cooled brownies in an airtight container and store them in the refrigerator for up to one week. The cold environment preserves moisture, keeping the brownies soft and chewy. When ready to serve, let them sit at room temperature for 10 minutes to bring out the full flavor.
Freezer Friendly
Wrap individual brownies in plastic wrap, then place them in a freezer‑safe bag. They’ll stay fresh for up to three months. To thaw, remove from the freezer and let them sit at room temperature for 15 minutes. The glaze will regain its glossy finish.
Best Reheating Method
Reheat a single brownie in the microwave on medium power for 15–20 seconds, or in a preheated oven at 300°F for 5 minutes. Add a tiny splash of water to the pan before reheating; the steam will keep the brownie moist and prevent it from drying out. The result is a warm, melty treat that feels like it was just baked.