I was standing in my kitchen, staring at a pile of burnt brownies and a refrigerator that smelled like stale popcorn when my roommate shouted, “You’ve got to try this, it’s the best thing since sliced bread!” That moment was the spark that led me to the ultimate S’Mores Icebox Cake. I pulled out a bag of graham crackers, a tub of cream cheese, and a jar of marshmallow fluff, and decided that if I could make a dessert that could be assembled in minutes and still taste like a campfire on a plate, I’d share it. The aroma that hit me as the fudge sauce drizzled over the crackers was the scent of summer nights and sticky fingers, the kind that makes you forget you’re indoors. I could hear the crunch of the crackers as they broke under my knife, feel the silky smoothness of the cream cheese mixture, taste the sweet caramel of the marshmallows, and see the glossy glaze of the hot fudge coating everything like a blanket of velvet. That instant, I knew I had stumbled onto something that would change how people think about no‑bake desserts forever.
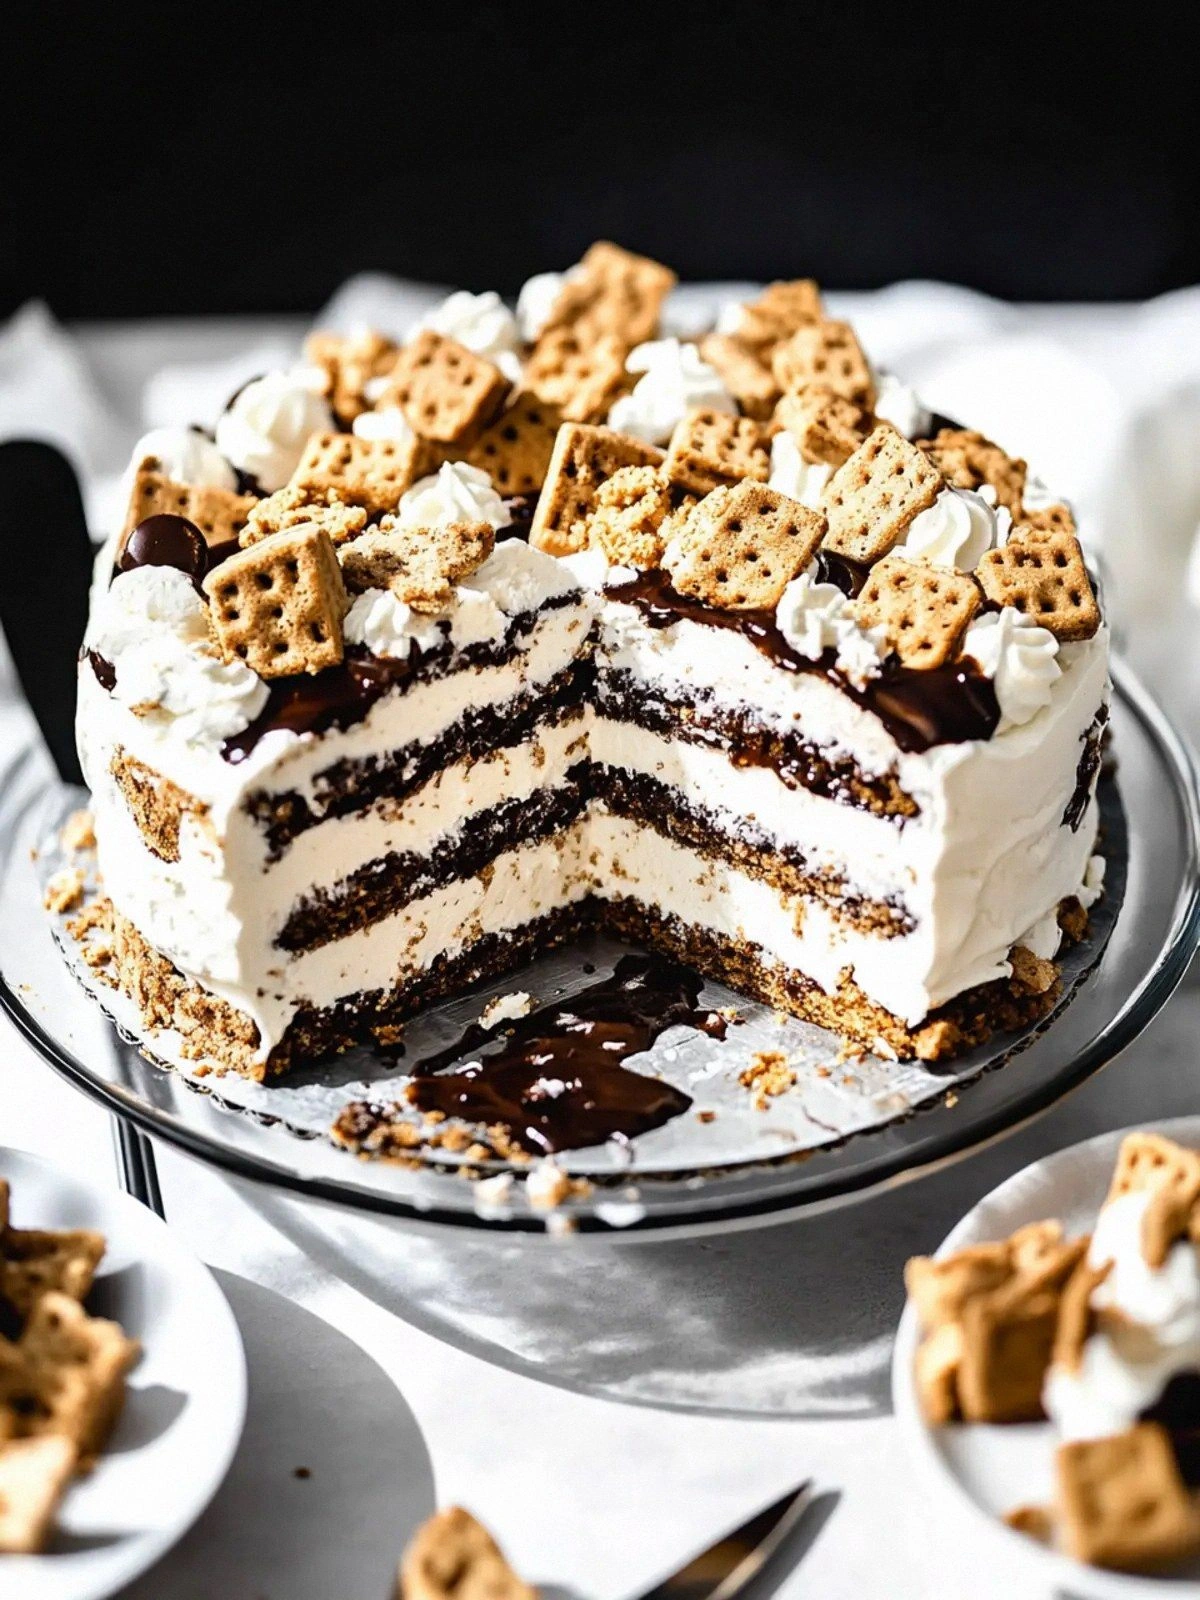
Fast forward a few days, and I had a prototype that looked like a dessert version of a campfire bonfire: layers of crunchy graham, a creamy heart, and a glossy chocolate swirl that made your eyes water with anticipation. I dared myself to taste it, and I almost didn’t finish the first bite because the flavors were so balanced that each mouthful felt like a revelation. I’ve tried countless versions of icebox cakes, from the bland, overly sweet ones to the ones that fall apart before you even get the first layer, but this one is hands down the best version you’ll ever make at home. It’s not just a dessert; it’s an experience that feels like a campfire, a hug, and a guilty pleasure all at once. I’ve been eating it for the past week, and I’m still surprised by how much I crave the first bite, which is why I’m sharing every single detail with you. Let me walk you through every single step—by the end, you’ll wonder how you ever made it any other way.
The first thing that sets this cake apart is the use of 12 sheets of graham crackers, not the usual handful. The sheer amount of crunch is what gives the cake its signature texture and makes every bite feel like a miniature campfire. I’ve learned that the best graham crackers are those that are slightly toasted before you break them into pieces, because a tiny toasty hint adds depth without overpowering the other flavors. The second secret is the cream cheese—8 ounces of it is a game changer. It’s thick enough to hold the layers together but light enough to melt into a silky, almost custard-like consistency when mixed with the marshmallow fluff. The third ingredient, 7 ounces of marshmallow fluff, gives the dessert that airy, cloud‑like quality that melts in your mouth, and the fourth, a cup of heavy cream, adds the necessary richness that balances the sweetness of the fudge.
When I first made this cake, I was skeptical about the hot fudge sauce. Most recipes use chocolate sauce, but I chose hot fudge because of its silky texture and caramel undertones that pair beautifully with the marshmallow fluff. The fifth ingredient, a cup of hot fudge sauce, coats the layers like a glossy coat of ice, adding a subtle caramel note that keeps the sweetness from becoming cloying. The sixth ingredient, a cup of mini marshmallows, is what creates that final layer of fluffy, melt‑in‑your‑mouth texture that makes the cake irresistible. The seventh ingredient, 1/2 cup of crushed graham crackers, is sprinkled on top for an extra crunch that snaps like thin ice. Lastly, 1/2 cup of milk chocolate pieces add a subtle chocolate bite that lingers on your palate and ties everything together.
I’ve spent hours experimenting with ratios, but the sweet spot is where the layers are thick enough to be substantial yet thin enough to set quickly in the fridge. The result is a cake that can be made in 15 minutes and set in just 30 minutes, making it perfect for last‑minute parties or a quick dessert after dinner. The texture is a symphony of crunch, cream, and melt, with each bite delivering a different sensation that keeps you coming back for more. The flavor profile is balanced—sweet, creamy, chocolatey, and slightly toasty—all without the need for a kitchen stove. I can’t emphasize enough how satisfying it feels to slice through that glossy glaze and watch the layers separate like a well‑planned symphony.
Picture yourself pulling this out of the fridge on a hot summer afternoon, the whole kitchen smelling of chocolate and toasted graham, and the sight of the glossy glaze reflecting the sunlight like a miniature aurora. The anticipation builds as you slice a piece, the crunch of graham crackers, the creamy melt of the cheese mixture, and the chocolate drizzle all mingling on your tongue. It’s a dessert that turns an ordinary gathering into a sweet celebration, and the best part? It’s so easy to make that you can focus on the fun moments instead of the prep work. I’ll be honest—I ate half the batch before anyone else got to try it. But that’s the sign of a truly irresistible recipe.
What Makes This Version Stand Out
- Crunch: 12 sheets of graham crackers provide a bold, satisfying crunch that contrasts beautifully with the creamy layers. The crackers are broken into small pieces, ensuring a uniform texture throughout the cake. A slight toasting of the crackers before breaking adds a subtle toasty flavor that elevates the overall taste.
- Texture: The combination of cream cheese, marshmallow fluff, and heavy cream creates a silky, custard‑like base that holds the layers together while remaining light enough to melt in your mouth. This texture is achieved without any baking, making the cake a perfect no‑bake dessert. The layers are firm enough to slice cleanly yet soft enough to dissolve with a single bite.
- Flavor Balance: Hot fudge sauce provides a caramel undertone that balances the sweetness of the marshmallow fluff. The milk chocolate pieces add a subtle chocolate bite that lingers on the palate. Together, these flavors create a harmonious dessert that feels indulgent yet not overpowering.
- Ease of Assembly: The cake requires no stove or oven, making it ideal for quick parties, last‑minute gatherings, or a lazy Sunday afternoon. All you need is a mixing bowl, a spoon, and a refrigerator. The simplicity of this recipe is its greatest strength.
- Make‑Ahead Potential: Because the cake sets in the refrigerator, you can assemble it a day ahead and simply chill it. This makes it a stress‑free dessert for events where you want to focus on other tasks. The layers remain fresh and flavorful even after a full day of refrigeration.
- Visual Appeal: The glossy hot fudge glaze and the contrasting colors of the graham crackers and chocolate pieces create an eye‑catching dessert that looks as good as it tastes. The cake’s glossy finish is reminiscent of a campfire’s glow, adding an element of nostalgia.
- Ingredient Quality: Using high‑quality ingredients—premium graham crackers, fresh cream cheese, and real hot fudge—ensures that every bite is rich and authentic. The recipe’s success hinges on the quality of each component, and it pays dividends in flavor.
- Scalability: The recipe can be easily scaled up or down, making it suitable for small family dinners or large parties. The proportions remain consistent, ensuring that the cake tastes the same no matter how many servings you make.
Inside the Ingredient List
The Flavor Base
8 oz Cream Cheese: Cream cheese is the backbone of this dessert, providing a rich, tangy flavor that balances the sweetness of the marshmallows and fudge. Its smooth texture allows it to blend seamlessly with the heavy cream, creating a silky base that holds the layers together. If you skip the cream cheese, the cake loses its creamy richness, and the layers become flimsy.
7 oz Marshmallow Fluff: Marshmallow fluff gives the cake its airy, cloud‑like quality. It’s light enough to melt in your mouth while still providing structure when combined with the cream cheese. Swapping marshmallow fluff for real marshmallows would change the texture dramatically, making the cake less smooth.
The Texture Crew
12 Sheets Graham Crackers: The graham crackers are the crunch factor. They break into small pieces that create a satisfying bite and provide a base that holds the creamy layers. Using a lighter or darker graham cracker can subtly change the flavor profile; lighter ones offer a milder taste, while darker ones add a caramelized note.
1/2 Cup Crushed Graham Crackers: These crushed crackers add a final crunch on top of the cake, giving it an extra layer of texture that snaps like thin ice. They also help the glaze set by providing a rough surface for it to adhere to. If you prefer a smoother top, you can skip this step, but the cake will feel less textured.
The Unexpected Star
1 Cup Hot Fudge Sauce: Hot fudge is not just a sauce; it’s a flavor enhancer that adds caramel undertones and a glossy finish. Its viscosity allows it to coat the layers without soaking in, maintaining the cake’s structure. If you replace hot fudge with chocolate syrup, the glaze will be thinner, and the cake may become soggy.
1 Cup Mini Marshmallows: Mini marshmallows are the final touch that adds a pop of sweetness and a chewy texture. They also serve as a decorative element that makes the cake look festive. If you’re allergic to marshmallows or prefer a different sweet, consider using dried fruit or chocolate chips.
The Final Flourish
1/2 Cup Milk Chocolate Pieces: Milk chocolate pieces add a subtle chocolate bite that lingers on the palate. They provide a contrasting flavor to the hot fudge and a textural bite that keeps the cake interesting. If you prefer dark chocolate, use it for a richer, more intense flavor profile.
1 Cup Heavy Cream: Heavy cream is essential for achieving the silky, custard‑like consistency of the cream cheese mixture. It also helps the mixture set in the refrigerator. If you use a lighter cream, the cake will be less rich and may not set as firmly.
Everything’s prepped? Good. Let’s get into the real action.
The Method — Step by Step
- Step 1: Prepare the Cream Base. In a medium bowl, combine the 8 ounces of cream cheese and 7 ounces of marshmallow fluff. Use a hand mixer on medium speed until the mixture is smooth and creamy, about 2–3 minutes. The goal is a silky texture that will hold the layers together. If the mixture is too stiff, add a splash of heavy cream to loosen it.
- Step 2: Add the Heavy Cream. Slowly pour in the cup of heavy cream while whisking continuously. The mixture should become light and airy. This step is crucial for achieving the custard‑like consistency that melts in your mouth. Be careful not to over‑whisk, or the mixture may become too frothy.
- Step 3: Melt the Hot Fudge. In a small saucepan, gently heat the cup of hot fudge sauce over low heat until it’s pourable. Use a wooden spoon to stir continuously. The fudge should be warm enough to coat the layers but not so hot that it burns the cream mixture. Set aside to cool slightly.
- Step 4: Assemble the First Layer. Spread a thin layer of the cream base evenly across the bottom of a 9×13 inch dish. Use a spatula to smooth the surface. This layer will act as the foundation for the graham crackers. The more even the base, the better the cake will hold together.
- Step 5: Add the Graham Cracker Layer. Break the 12 sheets of graham crackers into small pieces and sprinkle them evenly over the cream base. Press gently with your fingers to ensure they adhere. The crackers should be evenly distributed to avoid pockets of empty space. If you want a crunchier texture, lightly toast the crackers before breaking.
- Step 6: Drizzle Hot Fudge. While the crackers are still wet, drizzle the warm hot fudge sauce over the top. The fudge should pool in the crevices, creating a glossy, caramelized glaze. The glaze will add depth and a slightly sweet, slightly bitter contrast to the creamy layers.
- Step 7: Layer the Cream. Spoon a generous amount of the cream base over the graham crackers and fudge. Use a spatula to spread it evenly. This layer should be thick enough to create a distinct separation between the layers but not so thick that it overwhelms the cake.
- Step 8: Sprinkle Mini Marshmallows. Evenly scatter a cup of mini marshmallows over the cream layer. The marshmallows will soften slightly in the fridge, adding a chewy, sweet texture. They also add a decorative element that makes the cake look festive.
- Step 9: Add the Final Cream Layer. Repeat the cream base layer over the marshmallows. The cake now has three distinct layers: graham, cream, marshmallows, and cream again. The final layer should be smooth and glossy.
- Step 10: Finish with Chocolate Pieces. Sprinkle the 1/2 cup of milk chocolate pieces on top of the final cream layer. These pieces add a subtle chocolate bite and a decorative touch. If you prefer a more pronounced chocolate flavor, increase the amount slightly.
- Step 11: Chill in the Refrigerator. Cover the dish with plastic wrap and place it in the refrigerator for at least 2 hours, or until the cake has set firmly. The setting time allows the layers to meld together while keeping the texture distinct. The cake should be firm enough to slice cleanly.
- Step 12: Serve and Enjoy. Remove the cake from the fridge and slice with a sharp knife. The knife should glide through the layers without tearing the cake. Serve immediately, or keep the slices covered in the fridge for up to 3 days. The cake’s flavors intensify as it sits, making it even more irresistible.
Insider Tricks for Flawless Results
The Temperature Rule Nobody Follows
The key to a perfectly set icebox cake is keeping the fridge at the right temperature. If your fridge is too warm, the layers will never fully set, and the cake will become soggy. Aim for a temperature between 35°F and 38°F. This range ensures the cream base solidifies without becoming too hard, keeping the texture light and creamy.
Why Your Nose Knows Best
Before you finish the final glaze, take a quick sniff. A faint caramel aroma indicates the hot fudge has cooled enough to coat the cake without burning the cream. If you smell a burnt sweet, the fudge is still too hot and will ruin the delicate balance of flavors.
The 5-Minute Rest That Changes Everything
Once the cake has set in the fridge, let it rest at room temperature for 5 minutes before slicing. This short break allows the layers to relax slightly, making it easier to cut clean slices. Without this step, the cake can tear or crumble when you try to cut it.
Use a Sharp Knife for Clean Cuts
A dull knife will crush the cake instead of slicing it cleanly. Keep your knife sharp and run a hot towel over the blade before cutting. This ensures a crisp edge and a professional presentation.
Keep the Top Covered
Cover the cake with plastic wrap or a lid while it chills. This prevents the cake from absorbing odors from other foods in the fridge and keeps the surface from drying out. A dry surface can cause the glaze to crack when you cut into it.
Add a Splash of Water Before Reheating
If you need to reheat a slice, add a tiny splash of water to the bottom of the plate before microwaving. The steam will help the cake regain its moist, creamy texture. Avoid microwaving for more than 20 seconds to prevent the chocolate from burning.
Creative Twists and Variations
This recipe is a playground. Here are some of my favorite ways to switch things up:
Espresso‑Infused Delight
Add a tablespoon of espresso powder to the cream base for a subtle coffee flavor. The espresso pairs beautifully with the chocolate and gives the cake a sophisticated twist. It’s perfect for a brunch dessert or a late‑night treat.
Nutty Crunch Upgrade
Replace the graham crackers with crushed almonds or hazelnuts for a nutty crunch. The nuts add a savory element that balances the sweetness. This variation is great for those who love a bit of texture and flavor complexity.
Fruit‑Infused Layer
Fold diced strawberries or blueberries into the cream base before layering. The fruit adds a burst of freshness and a pop of color that makes the cake visually stunning. Just be sure to drain any excess juice to avoid sogginess.
Salted Caramel Twist
Swirl in a spoonful of salted caramel sauce into the hot fudge before drizzling. The caramel adds a sweet‑salty contrast that elevates the overall flavor profile. It’s a crowd‑pleaser at parties and a delightful surprise for your guests.
Vegan Version
Use coconut cream instead of heavy cream and a dairy‑free marshmallow fluff. Substitute the cream cheese with a vegan cream cheese alternative. The result is a plant‑based dessert that still delivers the same creamy, indulgent experience.
Holiday Spice Edition
Add a pinch of cinnamon or nutmeg to the cream base for a warm, spicy note. The spices complement the chocolate and marshmallow flavors, making the cake perfect for holiday gatherings. This version is especially cozy during cooler evenings.
Storing and Bringing It Back to Life
Fridge Storage
Store the cake in an airtight container in the refrigerator for up to 3 days. Keep it covered with plastic wrap or a lid to prevent it from absorbing other odors. When you’re ready to serve, let it sit at room temperature for 5 minutes to soften slightly.
Freezer Friendly
For longer storage, wrap the cake tightly in plastic wrap and then in aluminum foil before freezing. It can be kept in the freezer for up to 2 weeks. Thaw in the refrigerator overnight, then let it come to room temperature before serving.
Best Reheating Method
To reheat a slice, place it on a microwave‑safe plate, add a splash of water, and heat for 15–20 seconds. The water creates steam, keeping the cake moist and preventing the chocolate from burning. Alternatively, place a slice in a preheated oven at 300°F for 5 minutes for a warm, gooey treat.