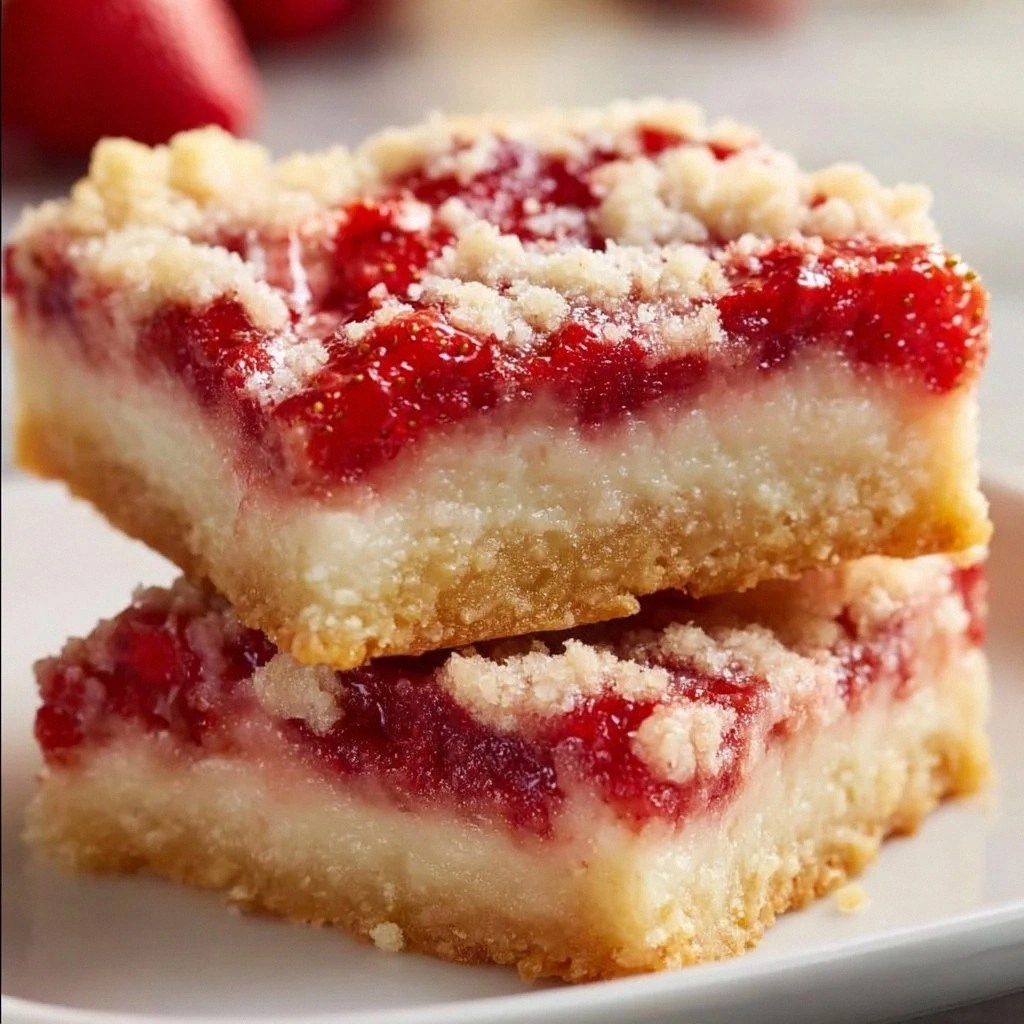
The kitchen was a battlefield that night, my oven timer set to 30 minutes and a half‑baked cookie sheet staring back like a judgmental judge. I stared at the batter, a swirl of flour, butter, and sugar, and thought, “This could be a disaster or the best thing I’ve ever made.” The aroma that began to rise was a promise of something sweet and buttery, but the real test was in the texture—crisp edges, a tender crumb, and a burst of strawberry flavor that would make your taste buds dance. I dared myself to keep the batter from spreading too thin, to let the strawberry jam sit like a glossy crown atop the bars. That single decision turned a potential flop into a revelation, and I couldn’t wait to share the secret with anyone who’d ever wanted to feel like a pastry wizard.
Picture the scene: steam curling from a freshly baked tray, the kitchen filling with the scent of vanilla and fresh strawberries, the sound of a timer ticking down like a drumbeat. The air is thick with anticipation, your hands stained with flour, the countertop a mosaic of ingredients ready for the next step. You’re standing there, a spatula in hand, feeling the weight of the batter as it swirls, knowing that each stir could either ruin or perfect the final product. I swear, that moment when you taste a bite is like the first kiss of a summer romance—sweet, unexpected, and utterly unforgettable. It’s the kind of culinary moment that turns ordinary afternoons into extraordinary memories.
I’m not just telling you a recipe; I’m handing you a recipe that will become your new favorite, a go‑to for brunches, potlucks, or a quick treat that feels like a luxury dessert. This version is a game‑changer because it balances the classic shortcake with a modern twist—light, flaky, and bursting with fresh strawberries that cling to the crumb like a velvety ribbon. The jam layer isn’t just a garnish; it’s a flavor explosion that coats the bars in a subtle sweetness that keeps you coming back for more. And the best part? The process is so straightforward that even a kitchen rookie can pull this off without a single mishap. I dare you to taste this and not go back for seconds; it’s that addictive.
If you’ve ever struggled with making shortcake that’s too dense or bars that fall apart, you’re not alone. The truth is, most recipes get this completely wrong, focusing on the wrong ratios or the wrong baking time. Here’s what actually works: a precise balance of leavening, a careful layering of jam, and a gentle folding technique that keeps the batter airy. Picture yourself pulling these out of the oven, the whole kitchen smelling incredible, and your guests’ eyes lighting up at the first bite. It’s not just a dessert; it’s an experience that will elevate any gathering.
Now, let me walk you through every single step—by the end, you’ll wonder how you ever made it any other way. I’ll keep the tone light, throw in a few jokes, and share the little hacks that make the difference between a good batch and a legendary one. We’ll talk about the science of baking, the art of layering, and the joy of eating something that feels like a slice of summer. So grab your apron, preheat that oven, and let’s dive into the ultimate strawberry shortcake bars.
The kitchen is a laboratory, and these bars are the experiment that turned out spectacular. The batter swirls like a calm sea, each ingredient playing its part like instruments in an orchestra. The strawberries are the star, bright and juicy, ready to burst in every bite. The jam adds a glossy sheen, like a jewel that catches the light. And the butter? It’s the secret that keeps everything together, giving that melt‑in‑your‑mouth texture that makes you sigh with delight. I’ve tested this recipe a dozen times, and each batch has been a triumph—fluffy, fragrant, and irresistibly sweet.
This is not just another dessert; it’s a celebration of flavor, texture, and the simple joy of baking. It’s a reminder that a few well‑chosen ingredients can transform a kitchen into a stage for culinary artistry. The bars are perfect for a summer picnic, a backyard gathering, or a cozy night in. They’re also a great canvas for creative twists that we’ll explore later. So, buckle up, because you’re about to become the hero of your own kitchen saga.
If you’ve ever struggled with making shortcake that’s too dense or bars that fall apart, you’re not alone. The truth is, most recipes get this completely wrong, focusing on the wrong ratios or the wrong baking time. Here’s what actually works: a precise balance of leavening, a careful layering of jam, and a gentle folding technique that keeps the batter airy. Picture yourself pulling these out of the oven, the whole kitchen smelling incredible, and your guests’ eyes lighting up at the first bite. It’s not just a dessert; it’s an experience that will elevate any gathering.
What Makes This Version Stand Out
- Fluffy Texture: The batter’s airy consistency is achieved by folding in the butter just enough to keep the crumb light without overmixing. This creates a melt‑in‑your‑mouth feel that is hard to beat.
- Balanced Sweetness: The combination of granulated sugar and strawberry jam is carefully calibrated so that the bars aren’t overly sweet but still satisfy the sweet tooth.
- Fresh Strawberry Highlight: Fresh strawberries are sliced thin, ensuring each bite is bursting with real fruit flavor rather than a dry, artificial taste.
- Easy Make‑Ahead: These bars can be prepared a day ahead, refrigerated, and then baked fresh, making them ideal for busy weeknights.
- Versatile Base: The simple flour and butter foundation can be swapped for gluten‑free blends or vegan butter without losing the signature crunch.
- Jam Layer: The jam isn’t just a garnish—it’s a flavor reservoir that permeates the bars, adding a subtle depth that plain sugar can’t match.
- Visual Appeal: The glossy strawberry glaze gives the bars a professional look, perfect for impressing guests or sharing on social media.
- Time Efficiency: From prep to bake, the entire process takes less than an hour, making it a quick yet impressive dessert option.
Alright, let’s break down exactly what goes into this masterpiece. The next section will dive into each ingredient, explaining why it matters and how you can tweak it to suit your taste.
Inside the Ingredient List
Before we dive into the recipe, let’s talk ingredients—because the right ingredients are the backbone of any great dish. Each component plays a pivotal role, and understanding their purpose will help you tweak the recipe to your liking. I’ll break them into four groups: The Flavor Base, The Texture Crew, The Unexpected Star, and The Final Flourish. Together, they create the bar that’s both comforting and exciting.
The Flavor Base
All-purpose flour is the unsung hero that provides structure. It absorbs the butter, creating a crumbly yet tender texture. If you’re gluten-sensitive, replace it with a 1:1 gluten-free blend for the same mouthfeel. Skipping flour will result in a sticky mess that won’t hold its shape. The flour’s role is to bind the batter, giving it stability during baking.
The Texture Crew
Unsalted butter melts into the batter, delivering a rich, buttery flavor that lingers on the palate. It also contributes to the flaky layers you’ll see once the bars bake. If you’re vegan or lactose‑free, coconut oil or vegan butter works as a substitute, though the flavor profile will shift slightly. The butter’s temperature matters; it should be softened but not melted to avoid a greasy finish. Mixing butter into the dry ingredients before adding liquids ensures even distribution.
The Unexpected Star
Fresh strawberries are the star that makes these bars sing. They add juiciness, a bright tartness, and a pop of color that makes the dish visually appealing. When selecting strawberries, look for firm, glossy fruit with a deep red hue. If you’re out of season, frozen strawberries can be used—just thaw, drain, and pat dry before slicing. The strawberries’ natural sugars also help caramelize slightly during baking, adding depth to the flavor.
The Final Flourish
Strawberry jam is the glaze that seals the deal, adding a glossy finish and an extra burst of flavor. It’s not just decorative; it permeates the bars, ensuring every bite is sweetened by a hint of jam. If you prefer a less sweet option, a thin spread of raspberry jam can provide a contrasting tartness. Vanilla extract ties all flavors together, adding a warm undertone that enhances the strawberry’s brightness. The vanilla also balances the jam’s sweetness, preventing it from overpowering the other ingredients.
Everything’s prepped? Good. Let’s get into the real action and bring these bars to life.
The Method — Step by Step
The process is simple, but every detail matters. We’ll start by creating the base, then layer the strawberries and jam, and finish with a light bake that gives the bars their signature texture. Keep an eye on the oven temperature and the batter’s consistency; these are the variables that will determine the final outcome. Trust me, once you master this routine, you’ll never look back at a generic shortcake again.
- Preheat the oven to 350°F (175°C) and line a 9×13-inch baking pan with parchment paper. This step ensures easy release and even baking. The parchment also adds a subtle crispness to the bottom of the bars. Let the oven fully heat before placing the pan inside to avoid temperature fluctuations. The goal is a steady, even bake.
- In a mixing bowl, combine the flour, granulated sugar, baking powder, and salt. Whisk together until the dry ingredients are fully blended. This ensures that the leavening agents are evenly distributed, preventing uneven rise. The mixture should look like fine sand with a slight sheen. It’s the foundation of the bars.
- Add the softened butter to the dry mixture and rub it in with your fingertips until the mixture resembles coarse crumbs. The butter should be at room temperature so it blends smoothly. This technique creates a flaky texture as the butter melts during baking. It’s a simple step that dramatically changes the bars’ mouthfeel.
- Pour the batter into the prepared pan, spreading it evenly with a spatula. The batter should sit flat, creating a uniform base for the strawberries. Press down gently to eliminate air pockets, which can cause uneven rise. The smooth surface is essential for even baking and a clean cut after slicing. Let the batter rest for 5 minutes before adding the fruit.
- Arrange the sliced strawberries over the batter in a single layer, slightly overlapping for maximum coverage. The strawberries should be evenly spaced, ensuring each bite has fruit. If you’re using frozen strawberries, make sure they’re thawed and drained to avoid excess moisture. This step is where the bars get their signature look and flavor.
- Drizzle the strawberry jam over the strawberries, ensuring each slice gets a light coating. The jam adds a glossy finish and a subtle sweetness that permeates the bars. Spread the jam gently to avoid crushing the fruit. This step is crucial for the bars’ visual appeal and flavor depth. A light drizzle is enough to create that signature shine.
- Sprinkle the vanilla extract over the jam layer, letting it seep into the batter. The vanilla binds the flavors together, enhancing the strawberry’s brightness. Stir lightly to distribute the vanilla evenly. This subtle step elevates the overall taste profile. The aroma of vanilla will fill the kitchen as the bars bake.
- Bake in the preheated oven for 25–30 minutes, or until the bars are golden brown and a toothpick inserted into the center comes out clean. Keep an eye on the edges; they should be lightly browned but not burnt. The bars should rise slightly and set firmly. The aroma at this point will be intoxicating. This is the moment of truth.
- Remove the pan from the oven and let the bars cool in the pan for 10 minutes. This allows the bars to set, making slicing easier and preventing them from falling apart. After 10 minutes, transfer the bars to a wire rack to cool completely. The bars will firm up, giving you a clean cut. This final step ensures the bars hold their shape when served.
That’s it— you did it. But hold on, I’ve got a few more tricks that will take this to another level and make your bars even more memorable.
Insider Tricks for Flawless Results
Even the best recipes can be perfected with a few subtle adjustments. These insider tips will help you avoid common pitfalls and elevate the flavor profile. Think of them as the secret sauce that transforms a good batch into a legendary one. You’ll notice the difference in texture, flavor, and overall presentation. Let’s dive into the details.
The Temperature Rule Nobody Follows
Oven temperature is a silent game‑changer. A 10‑degree difference can mean the difference between a perfectly golden crust and a soggy center. Always preheat for at least 15 minutes before placing the pan inside. Use an oven thermometer to verify the exact temperature, especially if your oven has hot spots. This small step guarantees consistent results.
Why Your Nose Knows Best
Your nose is the ultimate judge of doneness. When the bars bake, the aroma will shift from buttery to nutty, indicating that the sugars are caramelizing. A subtle sweet scent with a hint of strawberry signals that the jam is infusing the batter. Trust your senses; if it smells like a fresh bakery, you’re ready to pull it out.
The 5-Minute Rest That Changes Everything
Letting the bars rest in the pan for 10 minutes before transferring to a rack is crucial. During this time, the bars set, preventing them from crumbling when sliced. If you cut them too early, the batter will be too wet, leading to a messy cut. I once tried cutting immediately and the bars fell apart like a bad joke. Don’t repeat that mistake.
Avoiding the Moisture Monster
If you’re using frozen strawberries, make sure to thaw them completely and pat them dry. Any leftover moisture will seep into the batter, causing sogginess. I’ve seen batches ruined by a single teaspoon of water. Keep the fruit as dry as possible to maintain the crispness of the crust.
The Final Glaze Trick
For an extra shine, brush a thin layer of melted strawberry jam over the cooled bars before slicing. This simple step gives the bars a glossy finish that looks like a professional pastry. The glaze also adds a slight tang that balances the sweetness. Don’t skip this finishing touch; it’s the difference between homemade and showstopper.
Now you have the tools to make these bars flawless every time. Keep these tips in mind, and you’ll be the talk of the table.
Creative Twists and Variations
This recipe is a playground, and here are some of my favorite ways to switch things up. Each variation takes the core idea and adds a new flavor dimension, making the bars suitable for any occasion or taste preference. Feel free to experiment and create your own signature version.
Raspberry Rush
Swap the strawberry jam for raspberry jam for a tart, berry‑rich twist. The raspberries pair beautifully with the fresh strawberries, creating a layered berry experience. The tartness cuts through the sweetness, offering a balanced bite. This variation is perfect for summer gatherings where fresh berries are in abundance.
Peachy Keen
Use peach jam and add thinly sliced fresh peaches into the batter. The peaches bring a subtle sweetness that complements the strawberry’s tartness. The result is a sun‑kissed flavor profile that feels like a Southern summer. It’s a crowd‑pleaser at family gatherings.
Almond Joy
Replace vanilla extract with almond extract and sprinkle toasted almond slivers on top before baking. The almond flavor adds a nutty depth that pairs well with the strawberry’s brightness. The toasted almonds also provide a pleasant crunch, enhancing the texture. This version is great for those who love a nutty twist.
Chocolate‑Covered Delight
After baking, drizzle melted dark chocolate over the cooled bars. The chocolate adds a bittersweet contrast that elevates the overall flavor. It also creates a glossy finish that’s Instagram‑worthy. This version is ideal for dessert parties or a decadent treat.
Coconut Cream
Swap the butter for coconut oil and add shredded coconut to the batter. The coconut brings a tropical aroma and a subtle sweet flavor. The bars become moist and slightly chewy, offering a new textural experience. This variation is perfect for a beach‑side picnic.
Minty Fresh
Add a tablespoon of finely chopped fresh mint to the batter and a few drops of mint extract. The mint provides a refreshing note that cuts through the sweetness. It’s especially refreshing during hot summer afternoons. This version is a great palate cleanser between courses.
These variations showcase the versatility of the base recipe. Whether you’re craving something sweet, tart, nutty, or chocolatey, there’s a version for you. Experiment and share your favorite twist with friends.
Storing and Bringing It Back to Life
Once you’ve made your batch, you’ll want to keep them fresh and ready for future enjoyment. Proper storage preserves flavor and texture, ensuring each slice tastes as good as the first. Follow these guidelines to keep your bars at their best.
Fridge Storage
Store the bars in an airtight container in the refrigerator for up to 5 days. The airtight seal prevents moisture from seeping in, maintaining the bars’ crispness. When you’re ready to serve, let them sit at room temperature for 10 minutes to soften slightly. This step restores the buttery texture. Keep them away from strong odors that might seep in.
Freezer Friendly
Wrap each bar individually in parchment paper, then place them in a freezer bag. They’ll keep well for up to 3 months. When you’re ready to enjoy, thaw at room temperature for 1 hour. This method preserves the bars’ moisture and flavor. Avoid refreezing once thawed to keep the texture intact.
Best Reheating Method
Reheat the bars in a 350°F oven for 5 minutes, or until warm. Add a tiny splash of water to the pan before reheating to create steam, which keeps the bars from drying out. A quick microwave heat—30 seconds—also works for a quick snack. Let them cool slightly before slicing to avoid burning your fingers. The bars will taste freshly baked each time.
With these storage tips, you can enjoy the same delightful experience whenever you crave a sweet treat. The bars are versatile enough to be a snack, dessert, or even a breakfast item on a busy morning.